Firestore can make up for a great backend application. You can get started quite easily, scale it up nicely, and in general, worry less about the “server” side of things. While it is quite easy to use Firestore as-is, using it in Vue opens up a whole new universe.
But, first - let’s go through the grind of knowing why we would want to do this? And, of course, to please everyone who just happens to be here reading the next exciting story on a lazy afternoon.
Firestore?
Firestore is a no SQL database by Google that is available on cloud. You can do exciting things like storing data and accessing data - all without maintaining a database of your own. If you are indeed truly delighted by this phenomenon -
- You have arrived to the great 2010’s when everything’s a web service - welcome! And oh, we crossed over to the new decade this year
- What exactly are you doing here? I mean here on this Blog, on earth, and at this moment? It is time to contemplate life I guess
That will be the last of the poor jokes, I promise. Onwards then.
Firestore is a God-send for -
- Small experiments and projects - you can get started for free, and have exactly zero ongoing server costs if you stay within limits
- Large projects that require rapid scalability
- Applications where you have enough problems and don’t want to add a server ecosystem to the mix (e.g. mobile apps)
Get started by visiting this link, signing up and head over to the console.
Let’s see some more of Firestore and Vue by creating a “totally not twitter” application. Users should be able to -
- Tweet
- Retweet
- That’s pretty much it - this is not “twitter” after all
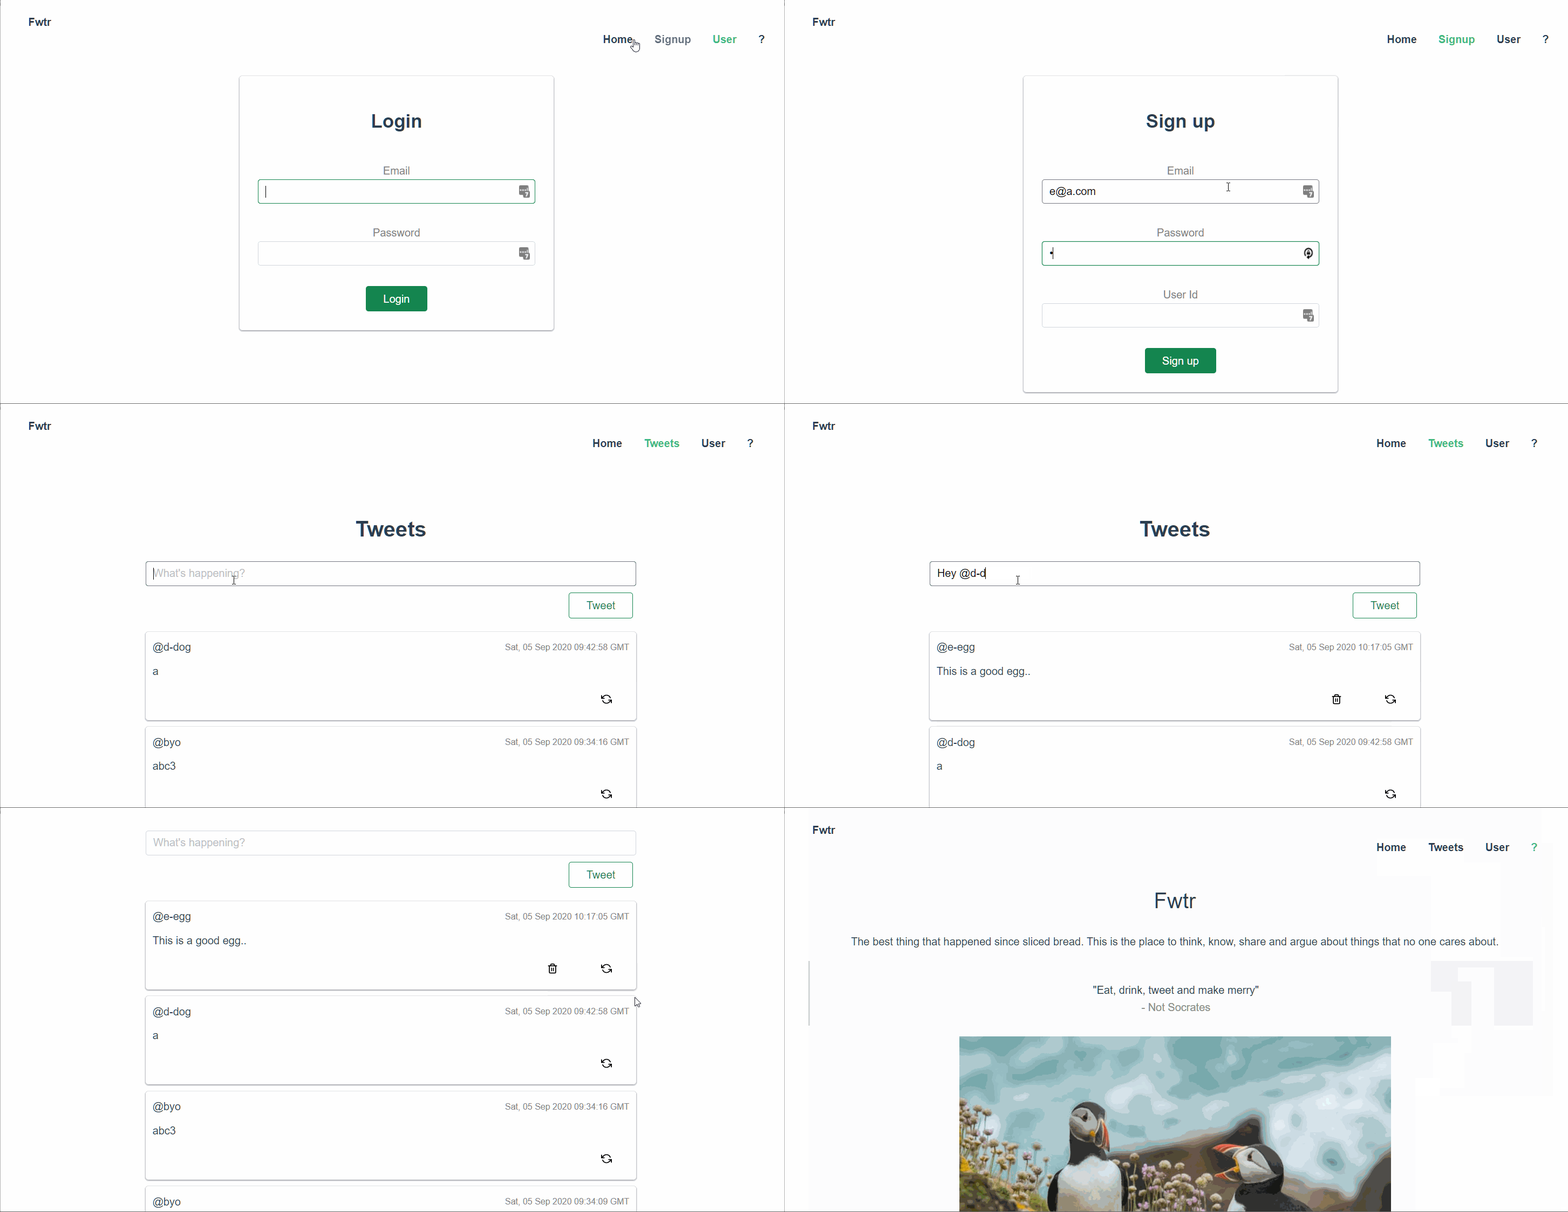
This is how it looks -

If you are not disappointed yet (did you really think we will build Twitter in one blog post?), read on - things are going to be set on 🔥.
Getting Started
Create a Vue project.
Install the Vue CLI if you have not done it before.
npm i -g @vue/cli
Create the project.
vue create fwtr
Answer a bunch of questions - we choose no to everything except Vue Router & Vuex store. vue-cli installs and configures everything for you.
Next, install vue-fire, an awesome package that provides a Vue wrapper for firebase. We could use Firebase/Firestore as-is, but Vuefire just makes things a bit easy.
npm i --save vuefire firebase
While at it, let’s install a small toast library to show alerts and messages.
npm i --save vue-toast-notification
Start your Vue project.
npm run serve
Head over to the Firestore console. Create a new project by clicking the big, bold button, and follow the guided wizard.
- Name the project
- Enable Google Analytics and select an Analytics account (optional)
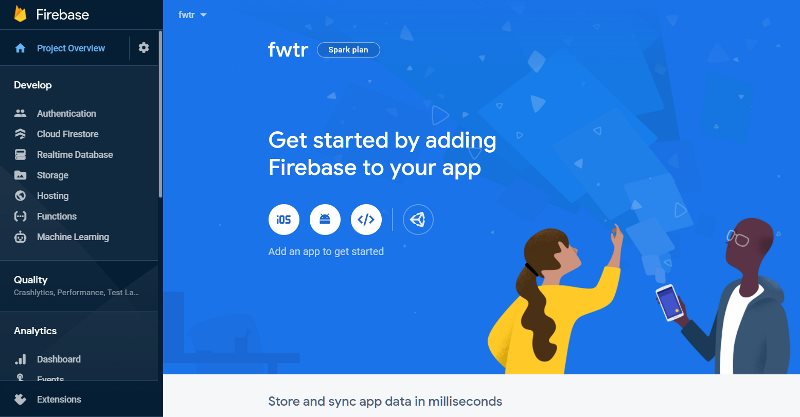
You will see the below project page once you are done with the setup.

Click on Web icon to register your web app. We don’t need Firestore hosting, but feel free to go wild. Provide any name and click Register to see the API details. Copy over the details.
Go to Cloud Firestore link in your Firebase console and click on “Create Database”. Choose “Start in test mode”, select a region near you and hit “Enable” to create a new database.
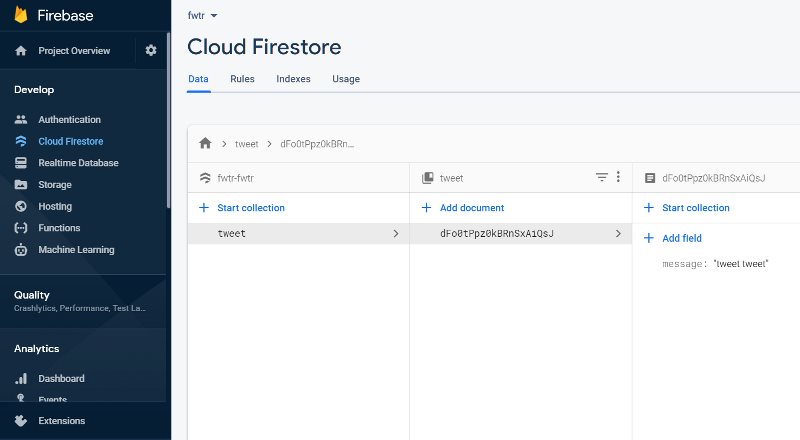
In the database page, click on “Start collection” > enter “tweets” as the collection name, and save. You can optionally enter one or more records in the collection.

You and your project are all fired up now.
Firestore configuration
In your project main.js, add two lines -
import { firestorePlugin } from "vuefire";

Vue.use(firestorePlugin);
We will also add the configuration required for the toast library.
import VueToast from "vue-toast-notification";
import "vue-toast-notification/dist/theme-default.css";
//  ...other code
Vue.use(VueToast, {
  position: "top-right",
});
Now, create a new file called db.js in your project root folder.
import firebase from "firebase/app";
import "firebase/firestore";

// Get a Firestore instance
export const db = firebase
  .initializeApp({ projectId: "fwtr-fwtr" })
  .firestore();
Replace fwtr-fwtr with your own project name - you would have provided the project name in the Firebase console.
Home Page
Let’s get back to our client app for a minute. First, let’s include a stylesheet - because, we (most of us) don’t live in caves no more.
Edit /public/index.html. Include the following statement to include an awesome library that automates your styling.
<!-- Code -->
<link rel="stylesheet" href="https://unpkg.com/chota@latest" />

<!-- Code -->
Chota.css is a minimal CSS framework that does not require you to “class” each and every element. It also provides a minimal grid and commonly used styled components.
Next, change the home page a bit to keep things interesting. Edit src/views/Home.vue.
<template>
  <div id="app">
    <nav id="nav">
      <div class="nav-left">
        <a class="brand">Fwtr</a>
      </div>
      <div class="nav-right">
        <router-link to="/" class="nav-link">Home</router-link>
        <router-link to="/tweets" v-if="user.uid">Tweets</router-link>
        <router-link to="/signup" v-else>Signup</router-link>
        <router-link to="/login">User</router-link>
        <router-link to="/about">?</router-link>
      </div>
    </nav>
    <router-view />
  </div>
</template>

<script>
  import { mapState } from "vuex";

  export default {
    computed: {
      ...mapState(["user"]),
    },
  };
</script>
We will also include some style classes but those have been ignored here for the sake of brevity - see App.vue in the repo.
Add code for router /src/router/index.js -
import Vue from "vue";
import VueRouter from "vue-router";
import Home from "../views/Home.vue";

Vue.use(VueRouter);

const routes = [
  {
    path: "/",
    name: "Home",
    component: Home,
  },
  {
    path: "/about",
    name: "About",
    // route level code-splitting
    // this generates a separate chunk (about.[hash].js) for this route
    // which is lazy-loaded when the route is visited.
    component: function () {
      return import(/* webpackChunkName: "about" */ "../views/About.vue");
    },
  },
  {
    path: "/tweets",
    name: "Tweets",
    component: function () {
      return import("../views/Tweets.vue");
    },
  },
  {
    path: "/signup",
    name: "Signup",
    component: function () {
      return import("../views/Signup.vue");
    },
  },
  {
    path: "/login",
    name: "Login",
    component: function () {
      return import("../views/Login.vue");
    },
  },
];

const router = new VueRouter({
  mode: "history",
  routes,
});

export default router;
..and add some code to the store -
import Vue from "vue";
import Vuex from "vuex";

Vue.use(Vuex);

export default new Vuex.Store({
  state: {
    user: {},
  },
  mutations: {
    setUser(state, val) {
      state.user = val;
      console.log("updated state", state.user);
    },
  },
  actions: {},
  modules: {},
});
You should have something like this by now..

Authentication
A good fwtr application cannot exist without users who can shout everyone down and argue on significant pointless stuff. Enable users and authentication with the click or two in Firebase and Vue.
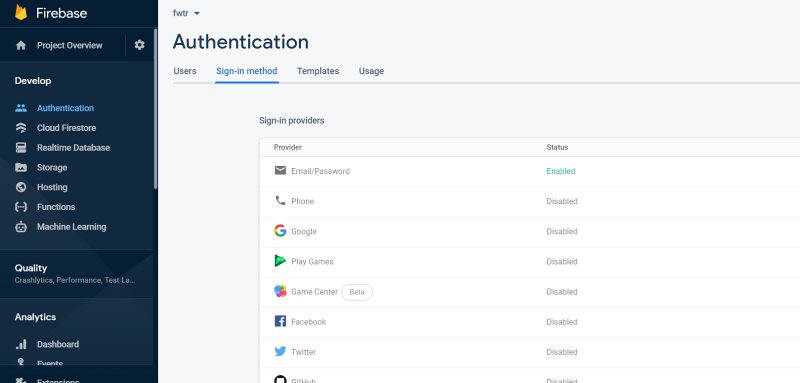
In your Firebase home page, select Authentication on the left tab bar. Navigate to Sign-in Method and enable authentication method. I have selected Email/Password as the only sign-in provider.

Back to your client app, let’s build registration and login functionality in the login page.
Create a Signup page at /src/views/Signup.vue -
<template>
  <div style="justify: center">
    <div class="row">
      <div class="col-3-md" />
      <div class="col">
        <div class="card cardycard row is-center">
          <h2
            class="col-12"
            style="font-weight:bold; padding-bottom:1em; padding-top:1em;"
          >
            Sign up
          </h2>
          <div class="col-12">
            <label for="login">Email</label>
            <input name="login" v-model="email" />
          </div>
          <div class="col-12">
            <label for="password">Password</label>
            <input name="password" type="password" v-model="password" />
          </div>
          <div class="col-12">
            <label for="userid">User Id</label>
            <input name="userid" v-model="userid" />
          </div>
          <div class="col-12">
            <a class="button primary" @click.stop="register">Sign up</a>
          </div>
        </div>
      </div>
      <div class="col-3-md" />
    </div>
  </div>
</template>

<script>
  import { db } from "../db";
  import firebase from "firebase";

  import { mapState, mapMutations } from "vuex";

  export default {
    data() {
      return {
        email: "",
        password: "",
        userid: "",
        login: {},
      };
    },

    methods: {
      ...mapMutations(["setUser"]),
      async register() {
        try {
          const provider = new firebase.auth.GoogleAuthProvider();
          const user = await firebase
            .auth()
            .createUserWithEmailAndPassword(this.email, this.password);
          await user.user.updateProfile({
            displayName: this.userid,
          });
          console.log("user: ", user);

          this.setUser({
            email: user.user.email,
            name: user.user.displayName,
            uid: user.user.uid,
            refreshToken: user.user.refreshToken,
            displayName: user.user.displayName,
          });

          this.$toast.success("Signed up!");
          this.$router.push("/tweets");
        } catch (e) {
          console.error(e);
          this.$toast.error(e.message);
        }
      },
    },
  };
</script>
We collect user email, password and display name (no validation!), and passing it across to Firestore to create the user in our system.
You can start clicking around and see the users getting created provided you create blank vue files for all the other links outlined in App.vue.
Next create a new file called /src/views/Login.vue and add code to create a couple of fields -
<template>
  <div style="justify: center">
    <div class="row">
      <div class="col-3-md" />
      <div class="col">
        <div class="card cardycard row is-center" v-if="!user.uid">
          <h2
            class="col-12"
            style="font-weight:bold; padding-bottom:1em; padding-top:1em;"
          >
            Login
          </h2>
          <div class="col-12">
            <label for="login">Email</label>
            <input name="login" v-model="email" />
          </div>
          <div class="col-12">
            <label for="password">Password</label>
            <input name="password" type="password" v-model="password" />
          </div>
          <div class="col-12">
            <a class="button primary" @click.stop="doLogin">Login</a>
          </div>
        </div>

        <div class="card cardycard row is-center" v-else>
          <div class="col-12">You are already logged in!</div>
          <div class="col-12">
            <a class="button primary" @click.stop="doLogout">Logout</a>
          </div>
        </div>
      </div>
      <div class="col-3-md" />
    </div>
  </div>
</template>

<script>
  import { db } from "../db";
  import firebase from "firebase";

  import { mapMutations, mapState } from "vuex";

  export default {
    data() {
      return {
        email: "",
        password: "",
        login: {},
      };
    },
    computed: {
      ...mapState(["user"]),
    },
    methods: {
      ...mapMutations(["setUser"]),
      async doLogout() {
        this.setUser({});
        await firebase.auth().signOut();
      },
      async doLogin() {
        try {
          const provider = new firebase.auth.GoogleAuthProvider();
          const { user } = await firebase
            .auth()
            .signInWithEmailAndPassword(this.email, this.password);

          this.setUser({
            email: user.email,
            name: user.displayName,
            uid: user.uid,
            refreshToken: user.refreshToken,
            displayName: user.displayName,
          });
          this.$toast.success("Logged in!");
          this.$router.push("/tweets");
        } catch (e) {
          this.$toast.error(e.message);
          console.error(e);
        }
      },
    },
  };
</script>
You should be able to login with users created through the signup page.
Let’s secure tweets on Firestore. Navigate to Firebase Console > Cloud Firestore. Click on Rules tab on main page. We will replace the default rules to allow only authenticated users to interact with our app.
rules_version = '2';
service cloud.firestore {
  match /databases/{database}/documents {

     match /tweets/{tweet} {
      allow create:
      	if request.auth != null && request.auth.uid == request.resource.data.uid

    	allow update, delete:
      	if request.auth != null && request.auth.uid == resource.data.uid
      allow read:
      	if true
    }
  }

}
All we have done here is to -
- enable authenticated users to read / create tweets
- enable only owners to delete or update tweets
With a couple of clicks on the Firebase console, and some copy/paste magic, we have created a secure app with full email/password authentication (incl. confirmation email and everything)!
Start Tweeting
Create /src/views/Tweet.vue and include the below code -
<template>
<div class="container">
<h1 style="font-weight:bold;">Tweets</h1>
<div class="row is-center">
<div class="col-10 col-8-md">
<form
class="row is-right"
@submit.prevent="postTweet()"
v-if="user.uid"
>
<input
name="tweetin"
v-model="tweetin"
placeholder="What's happening?"
class="col-12"
/>
<div class="col-2">
<a
class="button primary outline"
type="submit"
@click.prevent="postTweet()"
>
Tweet
</a>
</div>
</form>
</div>
<div
class="card tweetcard col-10 col-8-md"
v-for="(tweet, index) in tweets"
>
<div class="row">
<div class="col-6 is-left">@{{ tweet.uname }}</div>
<div class="col-6 is-right" style="color: grey; font-size: 80%">
{{ tweet.createdAt ? new Date(tweet.createdAt).toUTCString() : "" }}
</div>
<div class="col-12 is-left">{{ tweet.message }}</div>
<div class="col-12 is-right">
<a
class="button icon clear"
@click="deleteTweet(tweet.id)"
v-if="tweet.uid == user.uid"
>
<img
src="https://icongr.am/feather/trash-2.svg?size=16&color=amber"
alt="del"
/>
</a>
<a class="button icon clear" @click="postTweet(tweet.message)">
<img
src="https://icongr.am/feather/refresh-ccw.svg?size=16&color=#e1e1e1"
alt="rt"
/>
</a>
</div>
</div>
</div>
</div>
</div>
</template>
<script>
import { db } from "../db";
import { mapState } from "vuex";
export default {
data() {
return {
tweets: [],
tweetin: "",
};
},
computed: {
...mapState(["user"]),
},
mounted() {},
methods: {
async postTweet(twt) {
await db.collection("tweets").add({
message: `${twt ? twt : this.tweetin}`,
uid: this.user.uid,
uname: this.user.displayName,
createdAt: Date.now(),
});
if (!twt) this.tweetin = "";
},
async deleteTweet(id) {
try {
const rec = await db.collection("tweets").doc(id).delete();
} catch (e) {
this.$toast.error(e.message);
}
},
},
firestore: {
tweets: db.collection("tweets").orderBy("createdAt", "desc"),
},
};
</script>
And.. that’s it. You can celebrate and come back to do some testing whether your app indeed works.
Login with any user id, navigate to Tweets, and start tweeting. You can see others’ tweets and retweet them. You could also delete those covfefe tweets that seemed a good idea when you were in college.
The End
Hopefully you were entertained enough by this post? I always try to do my best with the jokes.. and of course, there was a bit of what Firestore could do.
The code for this project is available on Github.
Firestore is awesome, and Vue makes the entire developer experience delightful. Start weaving your magic with the combination and build great things.