Here’s a quick introduction to Razor pages in ASP.NET core, and an opinionated way to quickly start building applications using Razor pages. And yes, there is a case for using Razor pages even in 2020.
So.. ASP.net?
Yes, indeed. I have had a love-hate relationship with ASP.NET through years. I am way less productive using ASP.net but cannot ignore the speed that a dotnet web server provides. Take into account the super debugging capabilities/tooling and the sizeable market that keeps providing projects on the platform, we surely have more than a winner in ASP.NET.
And oh, it immensely helps that innovations like Blazor are exciting options to make web development arguably more productive and easier.
Why yet another introduction?
There are a million other introductions to ASP.NET platform. Microsoft’s own documentation and guides are immensely helpful for beginners at all stages. But, what I love to see is a quick way to create an app (or two) and make new developers comfortable with the ecosystem. At least that’s how I learn stuff and I found some of the tutorials I glanced through to be either too detailed, or at a superficially high level.
This introduction is more for developers who use a different language for web development. It is not quite intended for absolute beginners, but anyone should be able to follow along.
Firing off with ASP.net
There are two main ways to get started on development using ASP.net platform.
- Use Visual Studio: proven way that has been forever
- Use Visual Studio Code or your favourite editor and dotnet core CLI
Both ways deserve all the love they can get. I prefer VSCode, but will use Visual Studio in this tutorial because - why not. Going forward I will be basing discussions primarily on Visual Studio 2019 and dotnet Core 3.1.
Installation is somewhat boring and works on expected lines.
- Download Visual Studio from https://visualstudio.microsoft.com/
- Click, click, click to install
Visual Studio comes with dotnet SDK, and you should be all set by now. If you decide to use VSCode, just install the dotnet SDK separately. You should then be able to use all the command line goodness on the best code editor ever(tm).
See the install docs if you are stuck. (Stuck during install, really?)
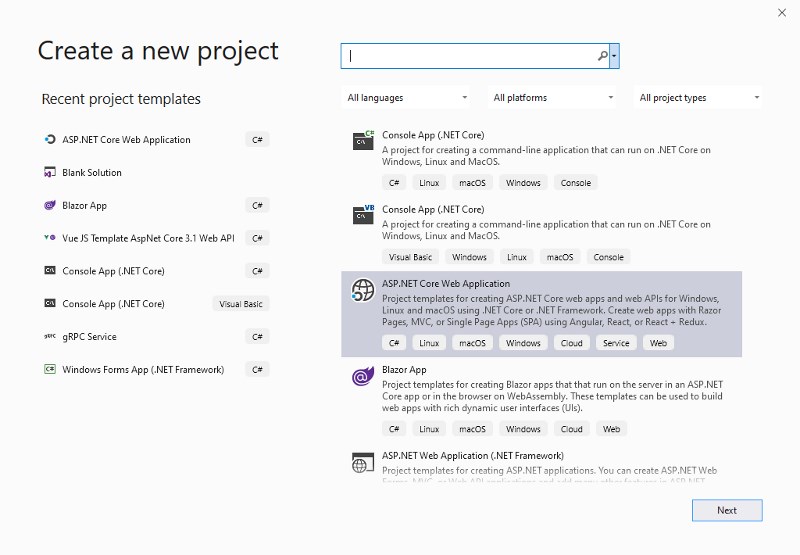
Once everything’s ready, just create a new project.

Select “ASP.NET Core Web Application”. Hit next and name your project. You will get another screen where you can select an “Web Application” template. This option will instruct Visual Studio to scaffold a few things when the project is created.
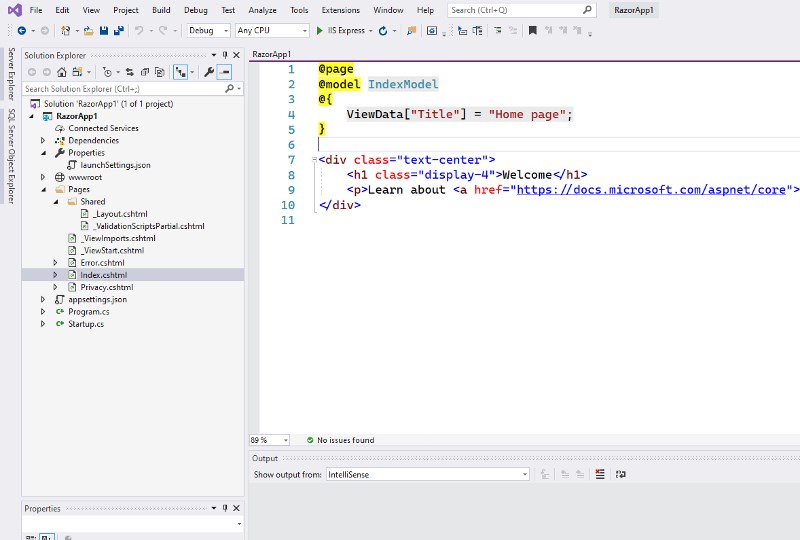
The Structure
As any modern web development stack, the files generated can be overwhelming at the beginning. We can break the structure down to basics.
A typical ASP.net project consists of one solution (which is a container for projects), and one or more projects. It will have at least one project (of course), anything else is optional and enables you to build stuff incrementally.

Beginning of everything: Startup.cs and Program.cs
These are the two files that bootstrap our app and give it ASP powers. When our app starts, the runtime calls Main method defined in Program.cs, which configures itself and starts running as an ASP app.
If you were so far wondering how our humble app came to acquire ASP powers, IHostBuilder is to blame. That interface provides our function CreateHostBuilder abilities to assume the powers of ASP.net, configure itself and start running - all in a simple one-line statement..
CreateHostBuilder(args).Build().Run();
More code in Program.cs uses C# lambdas and Dependency Injection (“DI”) to apply configuration parameters and methods defined in Startup.cs to our application.
public static IHostBuilder CreateHostBuilder(string[] args) =>
        Host.CreateDefaultBuilder(args)
            .ConfigureWebHostDefaults(webBuilder =>
            {
                webBuilder.UseStartup<Startup>();
            });
Further, ConfigureServices in Startup.cs has a specific block that enables Razor pages in your app.
public void ConfigureServices(IServiceCollection services)
{
    services.AddRazorPages();
}
The Configure method in Startup.cs enables a pipeline to include middleware, which in-turn enables various features for your app - all without needing you to code them in.
For e.g. -
public void Configure(IApplicationBuilder app, IWebHostEnvironment env)
{
    // ...
    app.UseHttpsRedirection();
    // ...
}
… tells runtime to redirect HTTP requests to HTTPS.
We will deal with lambda functions, DI etc. in more detail some other time. For now, we will move on and find out how we can quickly create our app on ASP.net.
Before we dig-in: settings and launchSettings.json
We have created a web application that runs as a command line app. The server is just serving content defined in web stuff like HTML/JS/CSS etc and in Razor pages, but does not render UI on its own.
Configuration parameters for our app is defined in launchSettings.json.
You can see the values defined in settings file in a nice user interface - right-click on the project (not the solution) in the right-hand-side bar, and select properties. Any change in one place is reflected in the other - just sayin'.
You may also notice the word “development” in the configuration file. We can provide parameters for any number of environments including development, and the start-up logic figures out the settings to apply. Further, secrets can be managed quite efficiently and made accessible to those who “need to know”. This is super helpful as you might imagine.
By default, the app uses IISExpress but there are options to use Kestrel, which is a light-weight (& a more modern) server by Microsoft. You will see these configuration options selected in the Toolbar as well. Typically, I prefer Kestrel since it is fast, and I end up hosting dotnet on Linux (where IIS is not available).
The ‘client-facing’ wwwroot
All the client-facing assets are stored in the www folder. This includes CSS, JS (custom and any libraries), static HTML, and anything else that finds its way to the browser.
Right off the bat, you see a sample CSS and JS, bootstrap and JQuery in the scaffolded files. Any and all of this can be changed or replaced. For e.g. you can replace Bootstrap with Bulma and chug along a different path.
Pages folder
Most of the action takes place here. Pages is where you place razor pages created using C#. The pages in C# get converted to something that the browser can understand by ASP.NET – we will see way more of pages in a few moments. Razor pages have the extension ‘cshtml’ files
You also see a Shared folder and a bunch of files starting with _. Shared folder is used to contain assets shared across the project, and the _ is a convention to create something called a ‘partial’. A partial is not a ‘complete’ page in itself, but comes together with other partials or pages to form complete pages.
Layout.cshtml is an example of a partial. In this file we have the header (which forms the header in the pages using this layout), a container (which will contain data), and the footer. The file also has references to script and HTML.
Of course, you can use different layouts, or decide not to use layouts at all – but building pages like this will make the entire process easy to build and to maintain.
In other notes, take a look at -
_ViewImports.cshtml: enables tag helpers globally_ViewStart.cshtml: base/master page
Error, Index and Privacy pages are the actual Razor pages. You will create something on these lines to for adding more pages to your app.
Expand Index.cshtml page to find a file called Index.cshtml.cs. This file has the C# code to go along with the mark-up page. You can refer to the variables, methods, etc. from this c# page in the mark-up cshtml page. This arrangement is akin to mark-up + code arrangement in any Vue/React/Svelte application. In Blazor, you can have mark-up + code in same or different files - but that is for a different day.
This structure is different from a typical MVC model that touts a distinct controller, model and view layer. These functions are present in the Razor page app, but not fashioned in MVC style.
More about the internals and workings of an ASP.net app
We are now masters of the structure of ASP.net core razor page project, and it is time to move on and see how everything comes together.
If you’re serious about your trade, you will skip this section altogether. The terms here just help you speak the same language - you will probably figure this out by yourself while building the actual app.
Routing
The Pages folder takes care of routing in our application. The files in the folder represent the URLs served by your application.
Let’s see how..
Privacy.cshtmlis a file in thePagesfolderbaseurl.com/privacywill request the page named ‘privacy.cshtml’ in the folder. ASP.net serves the HTML generated from the razor page.- Any sub-folder will also get included in the path. For e.g. a
blog/Hello.cshtmlis rendered onbaseurl.com/blog/Hello - If the requested page does not exist, a ‘page cannot be found’ error is displayed by default. You can configure the application to redirect requests to any other page (e.g.
index) if the page cannot be located
You can override the default routing using the @Page tag.
@page "/privacy1"
.. will enable the link to baseurl.com/privacy1 and the previously used /privacy page disappears into oblivion.
Start Tinkering
Run your app by hitting Ctrl + F5. Visual Studio opens the browser (or allows you to configure browser) and serves the application. You can see the starter page and navigate through the links provided in the scaffolded application.
You will see that any changes will require you to build/restart app. We can avoid that by executing our app in watch mode..
cd <project-folder>
dotnet run watch