I am a big fan of Vue and cannot breathe without static sites. So, it is only natural that I play around and implement Vue-based static sites for fun and profit.
Here’s a distilled-down version of my experience with Vuepress.
The Situation
I create static sites that are “real” websites. Typically the following factors in a static site generator help -
- A cool, easy-to-customise home page
- Themes/starter projects that make life easy
- Plugins that can extend functionality of core software
Although I had played around Vuepress quite a bit, I always ended up choosing non-Vue technologies like Hugo, or Vue-based static site generators like Gridsome or Saber.land.
More recently however, I decided to have this long drawn out project to create a free tutorial website. With great delight and big plans, I chose Vuepress.
This is that true story.
What exactly is Vuepress?
A Vue-based static site generator, which is created by Evan Yu and supported by the Vue team. If that is not enough to get you going, there are other factors too. Read on.
Vuepress was created for documentation sites but has official themes/plugins to create a blog as well.
- Create documentation sites
- Create full-scale websites (we will get back to this point)
- Create blogs
- Create eCommerce sites
- Make sites interactive with the power of Vue
Vuepress is simple, provides a standard experience, (kind of) easy to configure and easy to get started.
Getting Started on Vuepress
Create a project folder and install Vuepress.
mkdir awedocs
cd awedocs
yarn init
yarn add -D vuepress
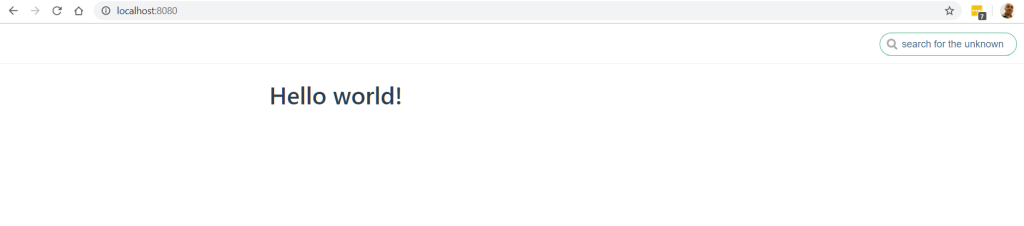
And then.. be prepared to act surprised - because there is nothing really there. There is little to see fresh out of the box. We need a few more steps to get there.
Open the awedocs folder in your VSCode. Create a sub directory called docs in the root folder. Then, create a file named README.md in docs folder. Enter following content in the file..
Hello world
md or markdown files will contain the content of your site. This file should be good for initial tests.
Open package.json and enter scripts to run Vuepress. Your entire file may look like below -
{
  "name": "awedocs",
  "version": "0.0.1",
  "description": "Awesome docs.",
  "scripts": {
    "dev": "vuepress dev docs",
    "build": "vuepress build docs"
  },
  "main": "index.js",
  "repository": "https://github.com/techformist/awedocs",
  "author": "Prashanth Krishnamurthy",
  "license": "MIT",
  "devDependencies": {
    "vuepress": "^1.2"
  },
  "dependencies": {}
}
Go back to command prompt, and issue the command ..
yarn dev
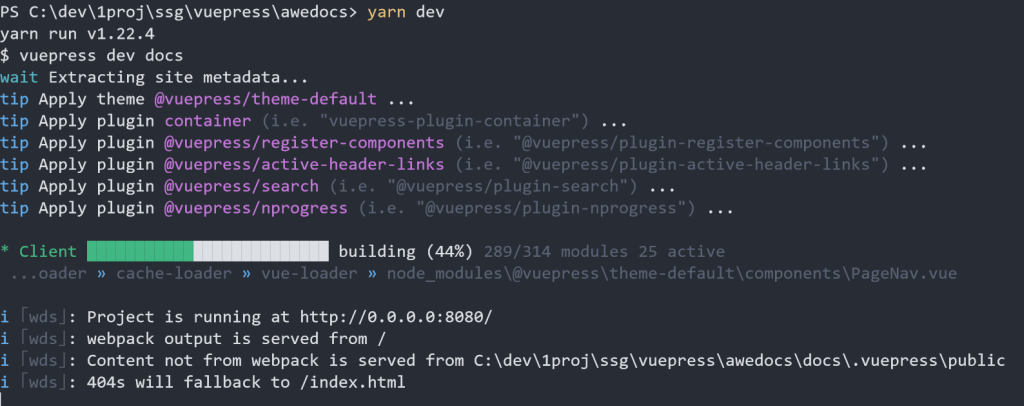
.. and ta da - you have your Vuepress site up and running.
You can make a few smart observations -
- Vuepress is minimal (at least in the beginning)
- Vuepress comes with a default theme
- Content and presentation layer is well isolated with the presentation layer
This means that -
- you can get started really really quickly. Install Vuepress -> start creating documents / blog posts
- you don’t need to learn Vue/Vuepress to use Vuepress to create a documentation site or blog
Making Vuepress your own
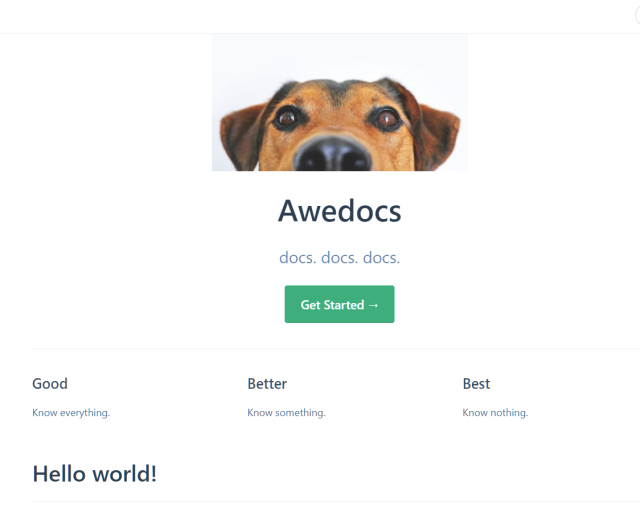
The site generated so far is functional but too minimal. Let’s add some jazz.
Update README.md with following content -
---
home: true
heroImage: /images/dog.jpg
heroText: Awedocs
tagline: docs. docs. docs.
actionText: Get Started →
actionLink: /more
features:
  - title: Good
    details: Know everything.
  - title: Better
    details: Know something.
  - title: Best
    details: Know nothing.

footer: MIT Licensed
---

# Hello world!
The content between --- is called frontmatter. This tells Vuepress to mete out some special treatment to the file.
Now do two things to support above content -
Add a file called
more.mdalongsideREADME.md.# Morrreee This is much more information than I can handle.Create a new folder
/docs/.vuepress/images. Save a sample image and name itdog.jpg.
Stop Vuepress dev server. Start it again.
yarn dev
You have something that resembles a typical website.
The /docs/.vuepress folder will have any and all customisations for your Vuepress instance. This includes -
- Vue Components
- Navigation bars
- Additional Javascript
- Styles
Content stays in the /docs folder.
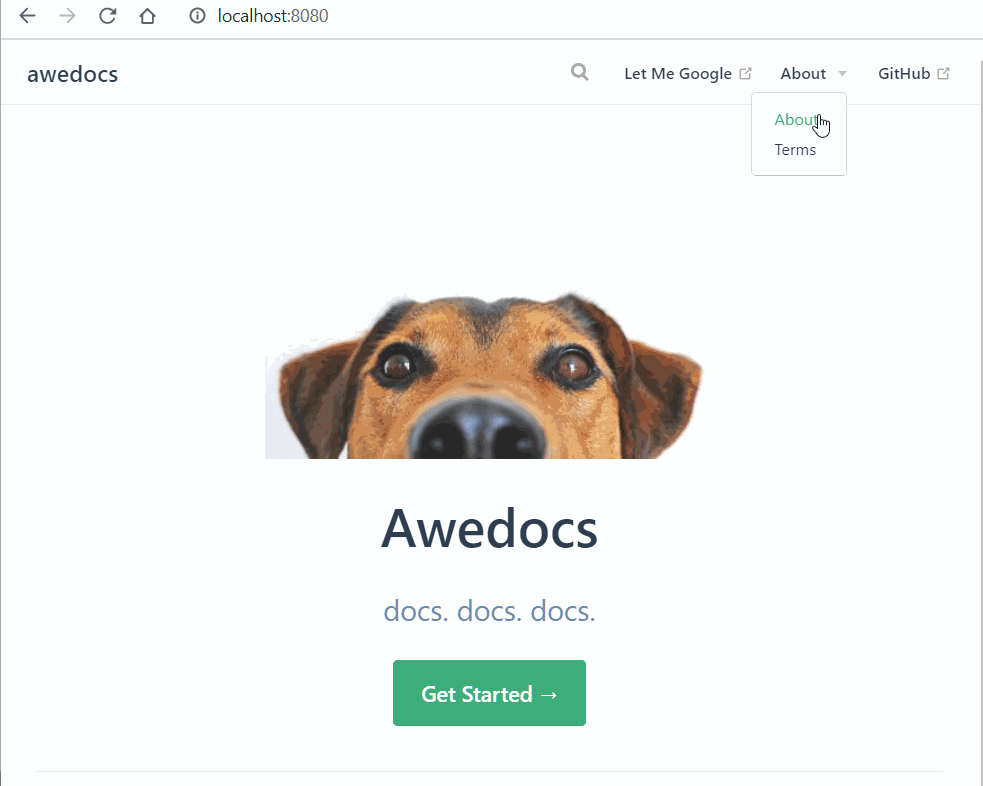
Add more UI elements
Lets add a sidebar and navbar.
Create a file called /docs/.vuepress/config.js, which will house all the configuration for Vuepress. Introduce following content in the file -
module.exports = {
base: "/",
title: "awedocs",
description: "Awesome docs",
themeConfig: {
label: "English",
editLinkText: "Edit this page on GitHub",
lastUpdated: "Last Updated",
nav: require("./nav"),
sidebar: [
{ title: "Home", children: [""] },
{
title: "Misc",
children: ["more"],
},
],
repo: "techformist/awedocs",
editLinks: true,
},
plugins: {
"@vuepress/back-to-top": {},
},
};
Create a file called .vuepress/nav.js.
module.exports = [
{
text: "Let Me Google",
link: "https://google.com",
},
{
text: "About",
items: [
{ text: "About", link: "/about" },
{ text: "Terms", link: "/terms" },
],
},
];
Restart Vuepress to see this -
Build and Deploy
Once you are ready, you do a simple -
yarn build
This will create a docs/.vuepress/dist folder. Upload this folder to your host and you are done!
What could I do next?
Well, sky’s the limit. Vuepress is based off Vue and Javascript - so you can do nothing short of magic.
There are a few things that can be highlighted here -
1. Add simple Vue components and interactivity
We can include interactive components in markdown.
Create a Vue component called AddNum.vue in docs/.vuepress/components/.
<template>
<div>
<div>
<label for="a">Num 1</label>
<input id="a" v-model="a" type="number" />
</div>
<div>
<label for="b">Num 2</label>
<input id="a" type="number" v-model="b" align="right" />
</div>
<div style="font-weight:bold; margin-top:15px">
<div>
<label for="sum">Sum =</label>
<input id="sum" type="number" :value="sum" align="right" />
</div>
</div>
</div>
</template>
<script>
export default {
data() {
return {
a: 0,
b: 0,
};
},
computed: {
sum() {
return +this.a + +this.b;
},
},
};
</script>
<style lang="css">
input {
text-align: center;
}
</style>
Include this component in more.md.
# Morrreee

This is much more information than I can handle.
But, I could do a sum for you.
<AddNum/>
See the magic of adding numbers on the fly.
Create even more complex components
Let us have a Vue gallery for our glorious site.
In the root folder do an install.
yarn add vue-gallery
Create /docs/.vuepress/Galleria.vue.
<template>
  <!-- code from https://www.npmjs.com/package/vue-gallery -->
  <div class="padme">
    <gallery :images="images" :index="index" @close="index = null"></gallery>
    <div
      class="image"
      v-for="(image, imageIndex) in images"
      :key="imageIndex"
      @click="index = imageIndex"
      :style="{
        backgroundImage: 'url(' + image + ')',
        width: '300px',
        height: '200px'
      }"
    ></div>
  </div>
</template>

<script>
  import VueGallery from "vue-gallery";

  export default {
    data: function () {
      return {
        images: [
          "https://dummyimage.com/800/ffffff/000000",
          "https://dummyimage.com/1600/ffffff/000000",
          "https://dummyimage.com/1280/000000/ffffff",
          "https://dummyimage.com/400/000000/ffffff",
        ],
        index: null,
      };
    },

    components: {
      gallery: VueGallery,
    },
  };
</script>

<style scoped>
  .image {
    float: clear;
    background-size: cover;
    background-repeat: no-repeat;
    background-position: center center;
    border: 1px solid #ebebeb;
    margin: 5px;
  }

  .padme {
    padding-top: 2.5em;
    padding-bottom: 2.5em;
  }
</style>
Include this component in our more.md.
# Morrreee
This is much more information than I can handle.
## Sum
But, I could do a sum for you.
<AddNum/>
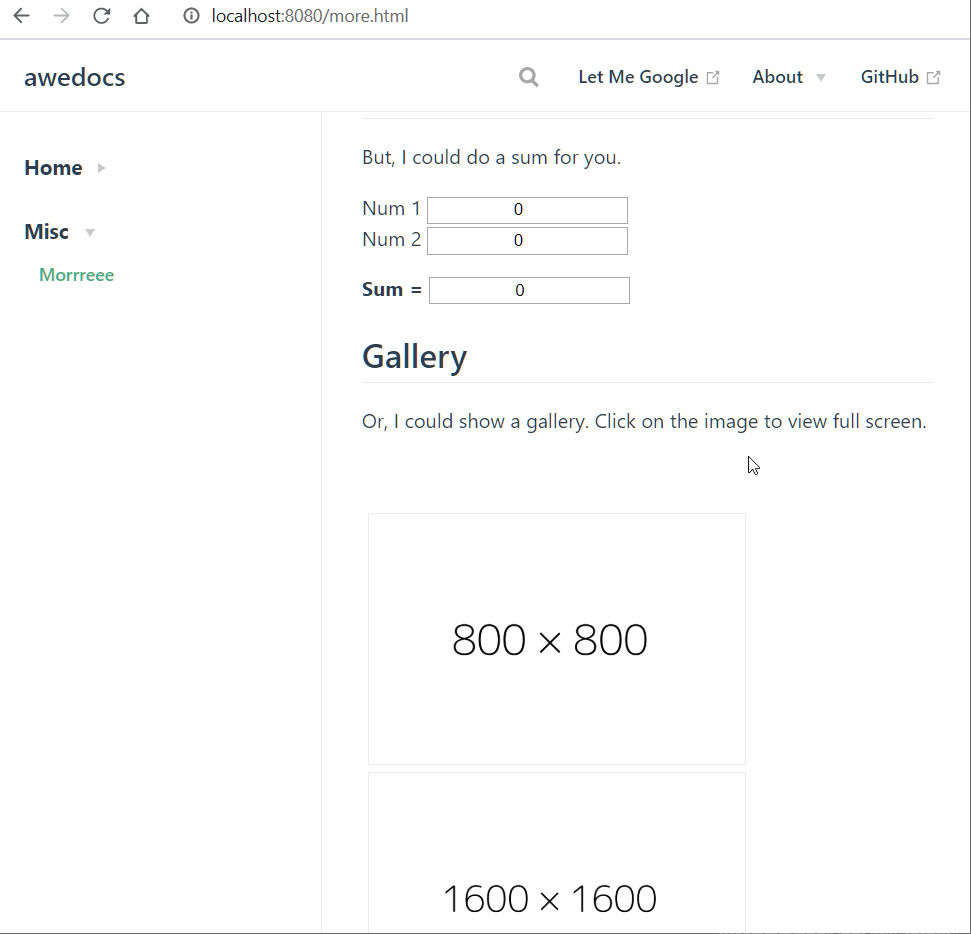
## Gallery
Or, I could show a gallery. Click on the image to view full screen.
<Galleria/>
You have a fully functioning gallery!
Note that we did not add this component anywhere other than creating a vue file, nor did we use the component.
3. Use a Vue plugin
Since Vuepress has Vue behind the scenes, we could hop on to the same magic train for our own nefarious schemes.
Do yet another install.
yarn add vue-typed-js
Create a new Vue file - /docs/.vuepress/components/.
<template>
  <div>
    <vue-typed-js
      :strings="[
        'once',
        'twice',
        'thrice',
        'four times',
        'five times',
        'infinity'
      ]"
      :loop="true"
    >
      <h4 style="color:red">Going.. <span class="typing"></span></h4>
    </vue-typed-js>
  </div>
</template>
Again, add this new component to our more.md.
# Morrreee

This is much more information than I can handle.

## Sum

But, I could do a sum for you.

<AddNum/>

## Gallery

Or, I could show a gallery. Click on the image to view full screen.

<Galleria/>

## Typing Ahoy

I could even show this cool type simulator.

<TypeAhoy/>
You now have some typing magic :)
Custom themes and plugins
So far you have seen themes provided by default in Vuepress. You can extend the theme or use a theme developed by third parties.
Similarly, you can develop custom functionality using plugins. Vuepress provides a number of core-team and community maintained plugins that do everything from enabling a blog on your site to creating a sitemap, creating diagrams using MermaidJS, or displaying your content as a presentation.
See themes and plugins listed on Vuepress.tools.
That was easy. Time to go crazy?
Well, it depends. Vuepress has its positives and not-so-positives.
For starters -
- Vuepress is easy to get started with. It’s out-of-box theme is great and anyone can get started in no time
- Provides a great user experience (similar to a single page app)
- It is easy to understand for non-techies. Provides a good isolation b/w content creation and presentation layers
- Has the full power of Vue behind it - you can provide super interactivity using Vue components and plugins
- Theming is quite strong
- It has some good plugins. You can also roll out your own plugin quite easily
On the other hand..
- Is not as flexible as more developer-friendly solutions like Gridsome. Yes, this is opinionated and YMMV
- I struggled a bit to implement adhoc taxonomies
- With dependency on Webpack, it does not lend itself well for lot of content
- It has a big initial payload, which is increasingly viewed as something that we live with (but wanted to mention it anyway)
Starting a documentation site and using a couple of plugins was easy enough, but my experience customising Vuepress was not that great (again, this is a ‘me’ experience). I found Gridsome or Saber.land easier to understand and customise to my heart’s content.
That said, I will probably use Vuetify for all the documentation sites going forward since it is quite simple and fast to get started with.